Saturday, April 22, 2023

Favourite Mac n Cheese

 photo pending

My updated and preferred method of making what is probably my favourite dish.

  • 1 C small-shape dry pasta
  • 1 Tbsp butter
  • 1 Tbsp flour
  • 1/8 tsp salt
  • dash cayenne pepper
  • 2/3 C milk
  • 1 C shredded sharp Cheddar cheese
  • 1/3 C panko bread crumbs
  • 1/4 C shredded Mexican cheese blend

1.  Preheat oven to 350°F.  Boil pasta according to package directions until just cooked or slightly al dente.  Do not overcook the pasta. 
2.  While the pasta is cooking, in a medium, heavy, oven-safe pan over medium-high heat, melt butter, using a whisk to move it around so that the melted butter covers the bottom and inner sides of the pan.  Once the butter is completely melted and starting to bubble, but before it begins to brown, add flour, salt, and cayenne.  Whisk to combine, and do not allow the flour to burn.  Add milk, a Tablespoon or so at a time, whisking constantly but not fast.  Be sure that the flour-butter mixture is being fully mixed into the milk with each addition.  It may not be necessary to use all of the milk, stop when the sauce is a little thinner than preferred consistency, as the cheese will thicken the sauce.
3.  Drain cooked pasta and leave in colander until needed. 
4.  Add sharp Cheddar cheese to sauce in small amounts, whisking through to fully melt cheese and mix it into sauce.  Once cheese sauce is complete, add drained pasta in small amounts and stir through.  Flatten pasta in sauce within the pan, filling the pan and creating an even top.
5.  Toss panko and Mexican cheese together, and spread over top of pasta in sauce. 
6.  Bake, at 350°F, for 20 minutes or until golden and crispy on top.  Remove from oven, run a spatula around the edge, and allow to cool for 2 minutes before serving.

Robyn's notes: this is a go-to recipe for me now, and typing it here is the first time I've actually written it up, I just do it from memory when I make it.  I have been known to add cooked crumbled bacon, and when I do so I will often replace a bit of the butter with bacon grease (not a lot, though, or the sauce will struggle to come together).  You can't specifically taste the cayenne with just a dash, it simply provides some depth of flavour, but I have a couple of times been overly generous with the dash and it's been noticeable then!  So if you like a bit of kick, feel free to go a little heavy on it.  Change up the cheese if desired--I've used Kerrygold Dubliner a few times--or add a favourite seasoning to the topping, whatever feels right.  The pan I use is an enameled cast iron 8 inch round skillet, happens to be made by Crock Pot (not sponsored).  I own two identical pans, in the teal that is my favourite colour, and they are holding up.  Watch me demonstrate this recipe on YouTube!

 ***** 5 Stars: Excellent. A favourite for both of us, I will make this repeatedly

Friday, March 4, 2022

Pice ar Maen


I had been wanting to make Welsh cakes for awhile, but basically just not getting around to it, because I knew they were traditionally made on a griddle, which I don't have.  One day I just decided to do it in my enamel cast iron skillet and they came out marvelously!

  •  1 1/2 C flour
  • 1/2 C sugar
  • 1 tsp baking powder
  • 1/4 rounded tsp salt
  • 1/4 tsp nutmeg
  • 8 Tbsp butter, cold, diced
  • 1/2 C milk chocolate chips
  • 1 egg, beaten with enough milk to yield 1/3 C liquid

1.  In a medium bowl, whisk together flour, sugar, baking powder, salt, and nutmeg.
2.  Work in the butter until mixture is evenly crumbly, a few larger pieces of butter can remain.  
3.  Mix in the chocolate chips.
4.  Add the milk/egg mixture, stirring until everything is moistened.
5.  Turn the sticky dough out onto a well-floured surface and shape into a disc.  Roll into a circle about 1/4 inch thick.  Be sure to reapply flour under the dough while rolling, so that it won't stick.  Cut dough into circles using 3 inch biscuit or other round cutter.  Gather and re-roll scraps, cutting until all dough is used.
6.  Heat an ungreased skillet over low-medium heat (for an electric skillet, set to 325°F).  Dry-fry the cakes (no grease) for about 2 1/2 minutes on each side, until golden brown and cooked through.  Let cool on a rack.

Robyn's notes: I don't even want to say how quickly I ate the first batch of these.  I didn't expect the dough to be as sticky as it was; simply cutting them out was a bit of a challenge.  Tradition would call for currants, not chocolate, but I went for my preference.  They certainly do make them with chocolate in Wales sometimes.  Do a test cake to see if the pan is the right heat.

**** 4 Stars: Very Good. Enjoyed by us both, I will make this frequently

Saturday, February 19, 2022

3-Ingredient Reese's Fudge

 picture coming soon

The well-known straightforward "cheater" Reese's fudge.

  • 14 oz can sweetened condensed milk
  • 3 C milk chocolate chips
  • 25 mini Reese's cups

1.  Line an 8 inch square pan with parchment paper, set aside.  Unwrap peanut butter cups and chop into pieces. 
2.  In a medium pan set over medium-low heat, combine condensed milk and chocolate chips, stirring, until chocolate is melted and mixture is smooth.
3.  Pour into prepared pan.  Press chopped Reese's into the fudge mixture.  Let cool for at least two hours.

Robyn's notes: This can cool in the fridge if you're in a hurry, I just prefer the way chocolate goods come out when they're cooled on the counter instead.  Store in an air-tight container.  If you put the Reese's in the freezer for about 15 minutes before starting, it'll be easier to unwrap them and they'll stay together in chunks better.


**** 4 Stars: Very Good. Enjoyed by us both, I will make this frequently

Wednesday, February 16, 2022

Simple Hash Brown Casserole

 picture coming soon

This seems like there's not enough to it to be satisfying, but somehow it really is.

  • 1/2 lb ground beef
  • 2 tsp ranch seasoning powder
  • 1/2 C shredded cheddar cheese
  • 1/2 C cream of potato soup (from a 10.5 oz can)
  • 1/4 C milk
  • 1 C shredded hash brown potatoes, thawed
  • salt and pepper to taste

1.  Preheat oven to 350°F.   In a medium skillet, brown ground beef, drain.  Stir in ranch seasoning.  Transfer beef to a 6"x9" glass casserole dish and flatten across the bottom.
2.  In a medium bowl, combine cheese, soup, milk, hash browns, and salt and pepper.  Spoon mixture over beef in casserole dish, and spread to cover.  If desired, top with extra cheese.  Bake at 350°F for 22-25 minutes.  If desired, for the last few minutes of cooking, switch to broiler setting to get a crispier topping.

Robyn's notes: to thaw the hash browns, line a bowl with paper towels, scoop the hash browns into the paper towels, cover with another paper towel, and either set aside on the counter for a few hours or microwave for 15-20 seconds.  The hash browns don't need to be warm, just not frozen.

*** 3 Stars: Good. At least one of us liked this enough for me to make it again, but not often

Thursday, January 20, 2022

Cheddar Bacon Ranch Burgers

I generally make these as sliders, simply because the inexpensive buns I get from the market here are really small, so it just makes sense to do four little burgers instead of two big ones that don't fit the buns.

  • 1/2 lb ground beef
  • 1/4 C shredded sharp cheddar cheese
  • 3 slices bacon, diced and cooked
  • 2 tsp ranch seasoning powder
  • 4 slices sharp cheddar cheese
  • 4 hamburger buns

1.  In medium bowl, combine beef, shredded cheese, cooked bacon, and ranch seasoning.  Form into four patties.
2.  Place burgers on grill and cook approximately 4 minutes per side.  Just before removing burgers from grill, place a slice of cheese atop each patty to melt.  Place patties on buns and top with preferred additions.

Robyn's notes: I use a George Foreman Grill for this recipe, so it's a cook time of four minutes total, not four minutes per side.  I've made these little sliders several times, there's something about that punch of ranch seasoning and the bacon and cheese being inside the burger that's very satisfying.

*** 3 Stars: Good. At least one of us liked this enough for me to make it again, but not often

Friday, December 10, 2021

Chicken Quesadillas

I love chicken quesadillas, but at home I always used to simply add chunks of chicken to cheese in a tortilla and, sorry, microwave it.  The sauce on this is quite tasty and the whole thing is a great way to use up leftover shredded chicken.

  • 1/2 C mayonnaise
  • 1/2 tsp taco seasoning
  • 1/8 tsp garlic salt
  • 1 tsp hot sauce
  • 4 flour tortillas
  • 1 C shredded Mexican cheese blend
  • 1 C shredded cooked chicken

1.  Whisk together mayo, taco seasoning, garlic salt, and hot sauce.  Spread mixture on one side of each tortilla.  Sprinkle cheese over sauce on half of each tortilla, then top the cheese with chicken.  Fold the other half of the tortilla over the side with cheese and chicken.
2.  Heat in microwave for 20 seconds, then saute in a skillet over medium heat for 3-4 minutes per side, until crispy but not blackened.

Robyn's notes: These can also be made with two full tortillas sandwiched over each other, of course, but I find quesadillas easier to flip when there's a fold on one side, so nothing can slide out that direction. It's also a good recipe for a countertop grill, which is what I used for the photo. In that case, don't bother microwaving first.

*** 3 Stars: Good. At least one of us liked this enough for me to make it again, but not often


Saturday, August 14, 2021

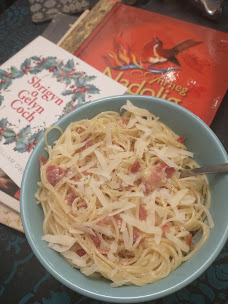
Pasta Carbonara


  • 1 large egg and 1 large yolk, room temperature 
  • 1 clove garlic, minced 
  • 1 ounce (about 1/3 packed cup) grated Parmesan 
  • Salt and Coarsely ground black pepper to taste 
  • 2 Tbsp water 
  • 2 ounces of pancetta or bacon, diced 
  • 6 ounces spaghetti

1.  Place a large pot of lightly salted water (no more than 1 tablespoon salt) over high heat, and bring to a boil.
2.  In a mixing bowl, whisk together the egg, yolk, garlic, and Parmesan. Season with a pinch of salt and generous black pepper.
3.  Meanwhile, heat large skillet over medium heat, add water and pork, and sauté until the fat just renders, on the edge of crispness but not hard. Remove from heat and set aside.
4.  Add pasta to the water and boil until a bit firmer than al dente. Just before pasta is ready, reheat pork in skillet, if needed. Place a stainless steel mixing bowl under colander, then drain pasta and let the draining pasta water heat the bowl.  Discard all but 1/4 C of the water, setting that aside, and use the empty heated bowl to combine all ingredients.  Stir for a minute or so.  Add some reserved pasta water if needed for creaminess. Serve immediately, dressing it with a bit of additional grated cheese and pepper.

 Robyn's notes: I have been working on my recipe for Pasta Carbonara for at least a year and a half.  The first time I made it, following a recipe from a well-regarded publication, I got pasta in scrambled egg.  So I did some research, and have been making slight tweaks to my recipe, trying to get it perfect.  I use very little of the pasta water, generally, but that's going to depend on taste and local conditions.  If desired, after the pork fat has cooled slightly, whisk one or two tablespoons, in a slow stream, into the egg/cheese/garlic mixture.

**** 4 Stars: Very Good. Enjoyed by us both, I will make this frequently